
What You Need to Start Making Sourdough Bread at Home
- May 8
- 4 min read
Starting to make sourdough bread at home can feel like a rewarding adventure. The process connects you with a natural way of baking that’s been around for centuries. If you’ve ever wanted to try baking your own sourdough, you might wonder what tools and ingredients you really need to get started. I’m here to walk you through the essentials, share some helpful tips, and suggest a few products that can make your sourdough journey easier and more enjoyable.
Essential Ingredients and Tools for Sourdough Baking
Making sourdough bread starts with a few simple ingredients, but having the right tools can make a big difference in your results. Here’s what you’ll need:
Ingredients
Flour: Most sourdough recipes use bread flour or all-purpose flour. I rather use a type 0.0 flour. Whole wheat or rye flour can also be added for flavor and nutrition.
Water: Use filtered or spring water if possible. Chlorinated tap water can affect the natural yeast, in addition to not being good for your health.
Salt: Sea salt or kosher salt works best to enhance flavor.
Sourdough Starter: This is the natural yeast culture that makes your bread rise. You can make your own starter from flour and water, or buy one to get started quickly.
Tools
Mixing Bowls: Large, non-reactive bowls for mixing dough.
Kitchen Scale: Measuring ingredients by weight is more accurate than volume.
Dough Scraper: Helps handle sticky dough and clean surfaces.
Proofing Basket (Banneton): Supports the dough during its final rise and creates a beautiful pattern on the crust.
Dutch Oven or Baking Stone: For baking the bread with steam, which helps develop a crispy crust.
Thermometer: To check dough temperature and baking doneness.
Glass container with lid: For keeping the starter in the fridge.
Having these basics will set you up for success. But if you want to make the process smoother, I recommend checking out some specific products that I’ve found helpful.

Recommended Products to Help You Start Sourdough Baking
When I first started baking sourdough, I quickly realized that having the right tools made a big difference. Here are two products I found especially useful, both available on Amazon:
1. Banneton Proofing Basket Set
A good proofing basket helps your dough keep its shape during the final rise. This set usually includes a round or oval basket made from natural rattan, which allows air to circulate and creates a lovely pattern on the crust.
Why it’s helpful: It supports the dough, prevents spreading, and improves the bread’s texture.
Example product: Banneton Proofing Basket Set on Amazon

2. Digital Kitchen Scale
Measuring ingredients by weight is key to consistent sourdough baking. A digital scale with a tare function lets you add ingredients directly to your mixing bowl without extra dishes.
Why it’s helpful: It ensures accuracy and reduces waste.
Example product: Digital Kitchen Scale on Amazon

Both of these items are affordable and make the sourdough process easier, especially for beginners. They help you focus on the craft without worrying about uneven dough or messy measurements.
How to Start Your Sourdough Journey
Once you have your ingredients and tools ready, the next step is to create or obtain a sourdough starter. This natural yeast culture is the heart of sourdough baking. You can make your own by mixing flour and water and letting it ferment over several days, or you can buy a starter to save time, or you can ask a friend who is already baking sourdough to share a litte with you - that's what I have done!
After you have your starter, the basic steps are:
Feed your starter regularly to keep it active. Keep it in the fridge when not using.
Mix flour, water, salt, and starter to make your dough. For my bread I use 650 grams of type 0.0 wheat flour, 390 grams of water, 195 grams of starter, and 1 teaspoon of salt.
Let the dough ferment and rise for several hours. I usually mix the ingredients before going to bed, leave it in the fridge, and start folding the dough in the morning, three times with an interval of an hour each.
Shape the dough and place it in your proofing basket.
Proof the dough for the final rise for another hour.
Bake the bread in a hot oven, ideally inside a Dutch oven or on a baking stone.
Each step takes patience, but the results are worth it. You’ll enjoy the smell of fresh bread and the satisfaction of making something wholesome from scratch.
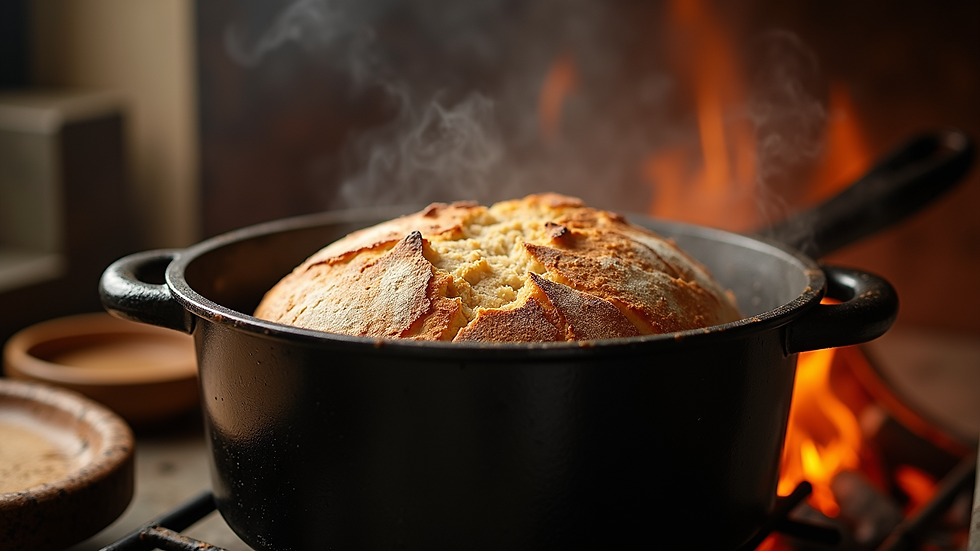
Eye-level view of a Dutch oven with sourdough bread baking inside
Tips for Success and Enjoyment
Sourdough baking is as much an art as it is a science. Here are some tips that helped me along the way:
Be patient: Sourdough takes time. Don’t rush the fermentation or proofing stages.
Keep your starter healthy: Feed it regularly and store it properly.
Use a kitchen scale: This improves consistency.
Experiment with flours: Try whole wheat or rye for different flavors.
Keep notes: Track your process and results to learn what works best.
If you want to dive deeper, there are many online communities and resources where bakers share their experiences. This can be a great way to stay motivated and learn new techniques.
Bringing It All Together
Starting sourdough baking is a wonderful way to connect with natural food and enjoy a creative, calming activity. With just a few ingredients and the right tools, you can make delicious bread that nourishes your body and soul.
Remember, the Banneton Proofing Basket and a reliable Digital Kitchen Scale are two tools that can make your baking smoother and more enjoyable. They help you handle the dough with care and measure ingredients precisely, which is key to great sourdough.
I encourage you to give it a try. Baking sourdough is a journey that rewards patience and care. Soon, you’ll be enjoying fresh, homemade bread that’s full of flavor and made with love.

High angle view of freshly baked sourdough bread cooling on a wooden board
Ready to start? Gather your ingredients, pick up a proofing basket and kitchen scale, and enjoy the process. Your kitchen will soon be filled with the warm aroma of homemade sourdough bread. Happy baking!
Comments